Codio already makes it extremely easy to simply jump in and start coding through your browser without having to worry about setting up servers. With full sudo and terminal access custom software can easily be installed, but as more customisations are added the setup becomes more complicated for others to recreate. This is why we created Codio Stacks, by snapshotting your box you can create an instantly deployable custom software stack for your students or team. Our Stacks are comparable to Docker containers and can easily be shared and further customised.

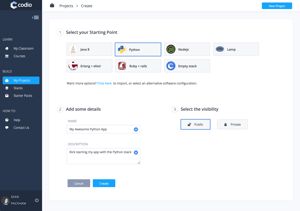
When you create a new project you get to choose which technology stack to use. Our empty stack is a cleanly installed Ubuntu 14.04.3 LTS box ready for you to customise. We provide many certified stacks customised with various technologies such as: Java 8, Python 3, Node.js, LAMP, Erlang + Elixir, Ruby on Rails and many more; ready for you to start building your next great app or course.

To create your own stack simply create a new project and select the stack you would like to base yours off as the starting point. Once your project has been created, open a terminal and install all the software you would like your stack to have. In the screenshot below I started with an empty stack and then installed Lua from the command line and then created helloworld.lua to test my setup.

To create a stack from this project head back to the Codio dashboard and select the Stacks tab on the left, then click the New Stack button on the top right. When creating a stack you base it on the installed software from one of your projects, in this case I want my stack to be the Codio Empty Stack + Lua so I selected my newly created Lua project.

Once your stack has been created you are shown its overview page from where you can further manage it.

If you would like to add new software to your stack, simply open the original project your stack is based on and make any changes, then click on the New Version button from the stack's overview page. To publish a new version you need to provide the source project, version string and a changelog detailing what changed in this version.

The Versions button shows you a timeline of all the stack's versions.

Now to truly experience the power of Codio Stacks you need to create a new project and select your custom stack as the starting point. Create a new project and instead of selecting one of the provided stacks click the click here link from the paragraph "Want more options? Click here to import, or select an alternative software configuration."

Now under the Empty with Stack option click the Browse button and select the stack you just created. The browse screen also lets you search all public stacks created by other users. Give your project a name and description and then create it.

In the screenshot below you can see how my newly created project has access to the lua command from the command line without having to setup anything! This was a simple example, but for complex setups it can save students many hours, allowing them to solve real problems instead of battling with software setup. You may have noticed that the helloworld.lua file I created is not there. This is because stacks only snapshot the system, and not the workspace with your project files.

The next post will show you how to bundle workspace project files with a software stack to create a Codio Starter Pack allowing you to quickly and easily create custom assignments.
To stay up to date on our teacher resources and product development, follow us on our blog, Twitter or Facebook.


